Learning Design and preparing to teach
Welcome
In the following two minute video, Mike introduces these pages by defining Learning Design and explaining the importance of ‘backward design’ when planning your modules.
Getting started
The Learning Design phase focuses on the Module learning activities we will develop in order to support our Module Assessments and our Module Learning Outcomes. These in turn then align back to our Intended Programme Assessments and the Programme Learning Outcomes.

The Learning Design phase sees the aims and plans of the Programme Scoping and Design phases translated into concrete actions. How will you best ensure that students can demonstrate the knowledge, skills and understanding required to succeed? For instance, if you have chosen a presentation as an assessment, what steps will your students take in their day-to-day learning to have the best chance of success?
Learning Design is an area that focuses primarily on ‘doing’: it asks of us what students and staff will be doing to make learning happen.
Tasks involved at this stage include:
- The development of module maps and lesson plans
- Practical implementation of assessments, assessment criteria and feedback
- The creation and curation of learning materials
- The drafting and / or scheduling of communications with students about their learning
Your module learning outcomes and, if possible, line plan will be helpful for you to stay focused and to best plan your time of you and your students in your module.
Planning for learning – Guiding principle
As you are planning, there are elements that should guide your decision making on practical matters. Use this checklist before planning schemes of work, modules or sessions.
- Deciding on your approach for getting students to co-create at this practical level
- Explore the Blended Learning Framework to establish how you will balance students’ learning on-campus and off-campus as well as the synchronous and asynchronous.
- Read up on Universal Design for Learning to plan inclusive activities, assessments and communications.
- Discuss as a programme team the core knowledge or concepts that students will have already learnt. Decide how you intend to build upon this in your lessons and materials.
As with all parts of the curriculum, constructively aligning the tasks you plan in a module to what we want students to do in their assessments (and beyond, as graduates) puts students on the road to success. However, It is easy to fall into the trap of focusing solely on content and the materials we will present to students.
Once you have determined the skills students will need to succeed in your assessments, you can begin thinking about the types of learning activities they should be doing in your module. ABC is a tool based on Laurillard’s Conversational Framework that can help us to ensure students are actively using their knowledge in well-aligned ways.
In this four minute video, Punsisi provides an overview of the ABC method, which focusses on learning outcomes to plot engaging learning journeys.
Below is an image of the six cards that are used to represent the different types of learning activities in the ABC method. The front side provides a brief definition of the learning activity type whilst the reverse provides example activities that could be used in the classroom.
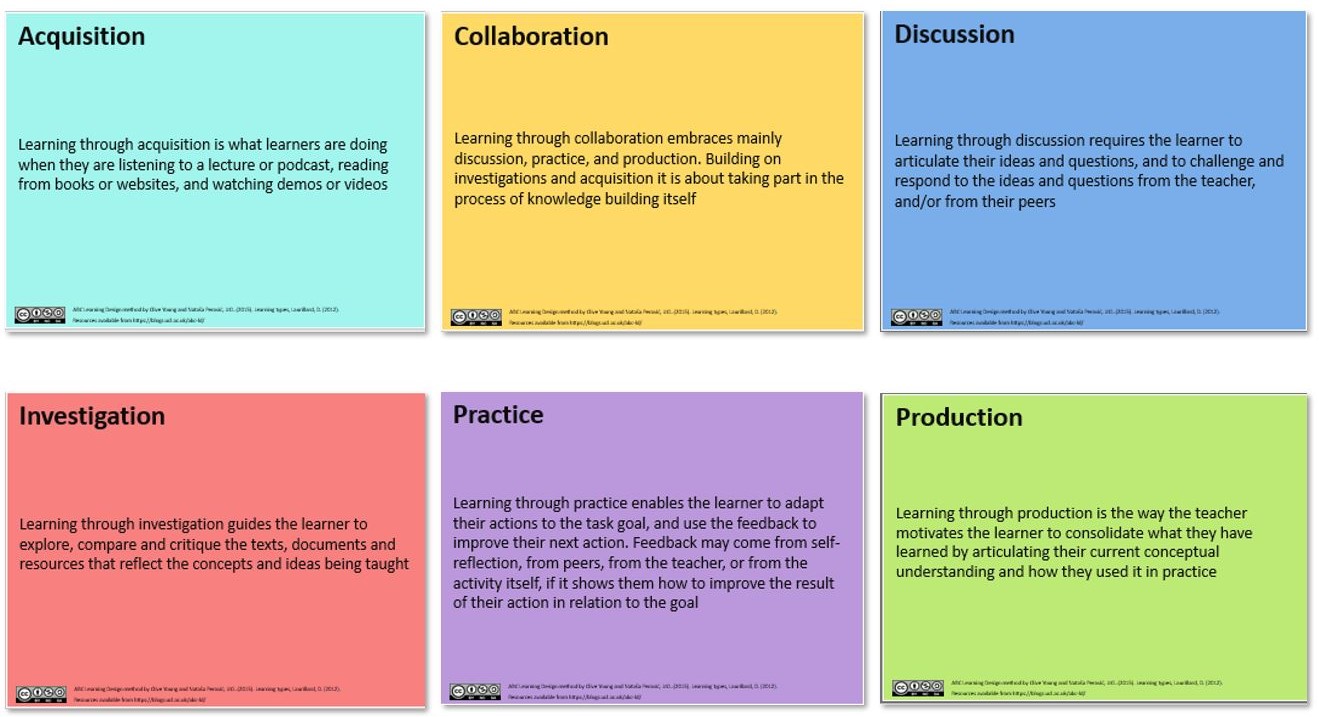
ABC cards in rainbow colours are depicted. Acquisition, collaboration, discussion, investigation, practice and production are each represented as Laurillard’s 6 learning-teaching activities.
Did you know? Students whose modules have higher levels of assimilation activities (passive reading, watching or listening) achieve worse outcomes than those in more active courses (Toetenel and Rienties 2016)
Designing a blend
In the following two and a half minute video, Mike defines Blended Learning and offers some quick, easy examples for you to use in your teaching.
Cardiff University’s Blended Learning Framework offers guidance and support for staff designing student learning in their modules. It is worth discussing as a programme how you intend to optimise student learning using on-campus and off-campus provision. The relationship between synchronous (students learning together at the same time) and asynchronous (students learning at their own pace) learning should also be designed and communicated with students.
It can be difficult to make decisions around what’s best when surrounded by choices. The Blended Learning Framework principles are provided to help make these decisions easier.
For each of the principles listed from the Blended Learning Framework, determine how you will embody them in your module (this activity would be even better if done at programme-level first to ensure students receive an even experience). Examples are given to start you off.
| Principle | Description | Example(s) |
| Keep it simple | This means getting the basics right and then adding in more sophisticated elements as appropriate. | Provide links to videos/reading online (it’s OK to use existing videos such as those on YouTube as long as the content is good) and ask students to share their thoughts on a discussion board.
Over time this can evolve into organised ‘watch parties’ and having students create the videos for next year’s students. |
| Concentrate on what works in a blended context | Acknowledging which learning activities work best in different environments and modes for your discipline | Offer assimilative learning tasks as online activities followed by interactive and active on-campus time e.g. provide links to videos and readings to be completed before a class, then use the class time for active learning such as discussions and debates. |
| Provide clarity and structure | Providing students with clear guidance and familiar structures to lessen cognitive load detracting from learning. | Using module maps and announcements to help students understand how their learning fits together.
Using the same template across modules for Learning Central/Ultra Choosing one polling software e.g. Mentimeter, and sticking with it across your module(s) Highlight when a topic links to previous learning by saying it in a class or by providing links back to the earlier topics online. This will help students to recognise how topics link together, empowering them to revise relevant materials if they are confused. |
| Focus on quality | Focus on purposeful, guided learning experiences rather than feeling that ‘more’ is better. | Providing links to a specific chapter of a book that students need to read and accompanying with questions rather than a whole book.
Recording short (under ten minutes), purposeful videos aligned to the learning outcomes. Adding context to topics and activities by highlighting the learning outcomes that they meet. These can be quickly added as an initialism e.g. LO1 – Learning Outcome 1, P01 – Programme Outcome 1. |
| Accessibility | This means ensuring, wherever possible, that module design and selection of learning resources is inclusive from the outset rather than making adjustments for certain students reactively. | Ensuring that learning activities are physically, socially and digitally accessible.
You can do this by offering students resources in alternative formats e.g. large font on worksheets. However, most students will have systems in place to adjust resources as long as they can get them ahead of the lesson, so add them to the VLE ahead of time. Providing for multiple modes of engagement by students (face to face, online, synchronous or asynchronous); providing multiples modes of representation of information; and providing multiple modes for action and expression of students. To do this, consider where variety would benefit your students e.g. if you have a number of students that consistently miss a class for valid reasons, offer an online discussion board for them to chat to each other whilst they catch up in their own time. This provides them with a safe space to actively contribute as those in the classroom did, whilst enabling you to track understanding and correct them where required. |
Here are some practical hand-outs to help with designing your blend:
- Module maps
- Tasks by learning type
- Ideas for digital assessments and a comprehensive e-book around planning a digital assessment (as seen elsewhere in the toolkit)
- A checklist for your Digital Learning Environment (Blackboard) module
Additionally, you might find this video on scaffolding learning in online spaces by Gilly Salmon helpful.
One of the ways of organising blended learning is by creating a ‘flipped classroom’ model. This is where students access learning content ahead of lectures, freeing up time in your sessions for you to design active learning sessions. If you are looking to develop your use of flipped learning approaches, see this page on Flipped Learning.
The structure of a module or unit of learning
In this two minute video, Andre offers guidance on structuring a module including tips for creating an engaging and effective learning journey for your students.
You would have already developed your MLOs and your Module Assessment Map/Strategy, from here there will be further tasks to define Module Structure:
- Student facing module map (To be shared via Learning Central)
- Design individual lesson plans
- Plan or pre-write your communications with students, including your module map
- When working within Blackboard Ultra, layout your learning modules in a clear, chronological manner
Preparing for and running assessments
Having developed the assessment strategy for your module, there are a number of matters to consider as the module gets underway. Where possible, you should seek to involve your students with these, not least to help your students enhance their assessment and feedback literacy. Not only can this assist with workload planning, but it can also help students produce better work and lead to a better learning experience.
Hence, it is helpful to consider up front:
- How the assessment will support student’s development in preparation for their future careers. It can help to motivate students if they understand that the assessment develops their work skills whilst also testing their knowledge.
- How you want your students to engage with formative tasks; the benefits to arise from this, the feedback comments they will receive, and ways in which you want your students to utilise these comments;
- Whether there are ways in which your students can be further involved in supporting the formative tasks (e.g. through self and/or peer assessment activities);
- How the marking of the summative tasks will be undertaken. e.g.
- Whether these are open-ended tasks best marked through the application and interpretation of assessment criteria, and if so, whether the generic criteria used across the programme are appropriate and sufficiently clear for this task, or whether you should develop specific criteria to use with this assessment (and involve your students in developing these?), OR;
- Whether the questions used in the assessment require a fixed answer, and thus the task needs to be supported by a detailed mark scheme to guide staff and students as to how marks will be awarded;
Whatever assessment methods are being used, you need to ensure all of the relevant assessment and feedback information is available to and accessible for students, and that markers and students have a shared understanding of how marking will be undertaken and of the academic standards they need to evidence in assessed work.
It is worth thinking about the potential for any potential assessment ‘nightmares’ in advance of running the assessment. Sambell gives a list of assessment nightmares and approaches to avoiding them.
Further support to help prepare for and run assessments is available from the Learning and Teaching Academy.
Module order
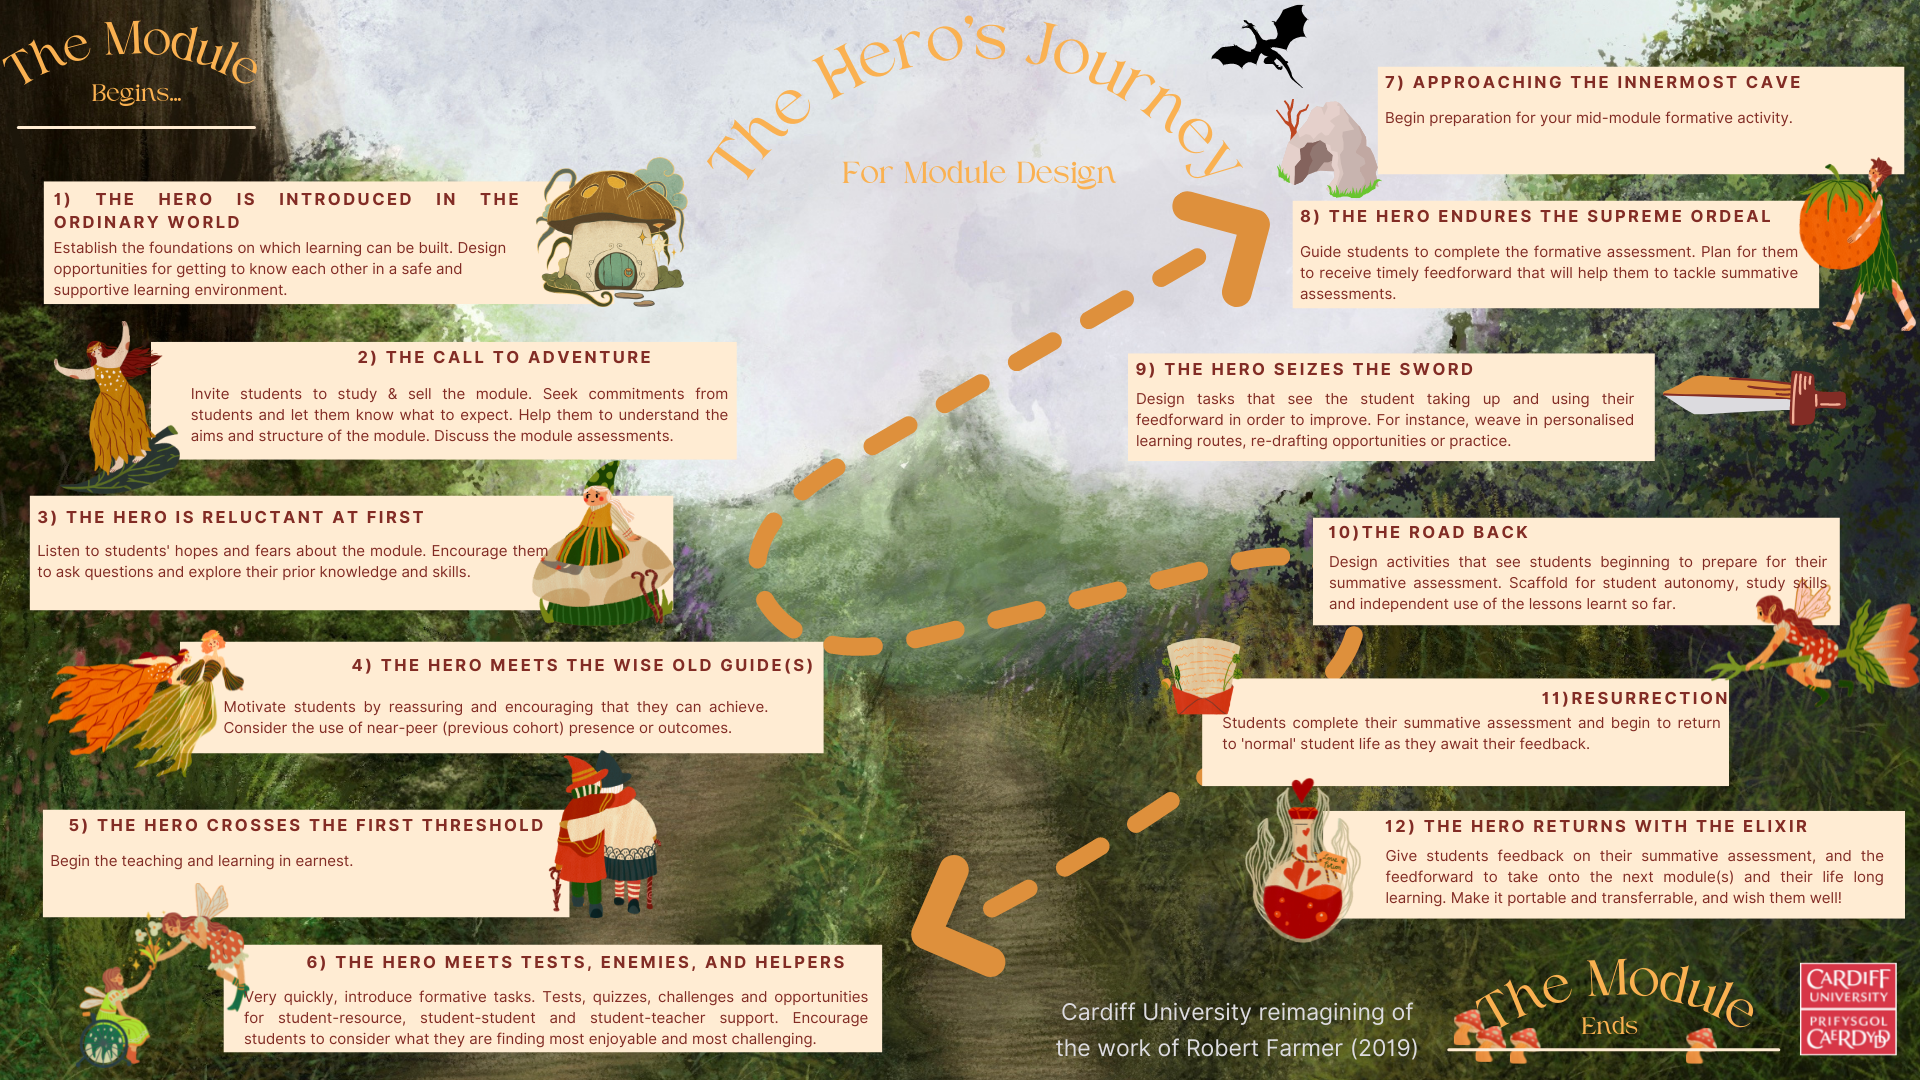
Imagining the shape of a module can be difficult, even with documents, calendars and trackers in front of us. Robert Farmer (2019) has employed a novel approach to inspire us and our students when faced with designing and understanding the lived experience of our modules, based on the literary structure of a ‘hero’s journey’. You may find that this helps you to conceptualise and imagine the journey of your students, with enemies (barriers to learning), battles to learn from (formative assessments) and the Wise Old Guides (you, your module team and colleagues from Professional Services!).
Use the following journey to imagine how your module journey could be structured in order to achieve your module learning outcomes. You could use your Programme Line Plan to see what stage students might be at across the programme by entering journey numbers in the cells.
The Hero’s Journey for Module Design
Hero's Journey text version
The Hero's Journey For Module Design
A Cardiff University reimagining of the work of Robert Farmer (2019)
The Module Begins…
1) THE HERO IS INTRODUCED IN THE ORDINARY WORLD
Establish the foundations on which learning can be built. Design opportunities for getting to know each other in a safe and supportive learning environment.
2) The Call to adventure
Invite students to study & sell the module. Seek commitments from students and let them know what to expect. Help them to understand the aims and structure of the module. Discuss the module assessments.
3) The HERO IS RELUCTANT AT FIRST
Listen to students' hopes and fears about the module. Encourage them to ask questions and explore their prior knowledge and skills.
4) The HERO meets the wise old guide(s)
Motivate students by reassuring and encouraging that they can achieve. Consider the use of near-peer (previous cohort) presence or outcomes.
5) The hero crosses the first threshold
Begin the teaching and learning in earnest.
6) The hero meets tests, enemies, and helpers
Very quickly, introduce formative tasks. Tests, quizzes, challenges and opportunities for student-resource, student-student and student-teacher support. Encourage students to consider what they are finding most enjoyable and most challenging.
7) Approaching the innermost cave
Begin preparation for your mid-module formative activity.
8) The hero endures the supreme ordeal
Guide students to complete the formative assessment. Plan for them to receive timely feedforward that will help them to tackle summative assessments.
9) The hero seizes the sword
Design tasks that see the student taking up and using their feedforward in order to improve. For instance, weave in personalised learning routes, re-drafting opportunities or practice.
10) The road back
Design activities that see students beginning to prepare for their summative assessment. Scaffold for student autonomy, study skills and independent use of the lessons learnt so far.
11) Resurrection
Students complete their summative assessment and begin to return to 'normal' student life as they await their feedback.
12) The hero returns with the elixir
Give students feedback on their summative assessment, and the feedforward to take onto the next module(s) and their lifelong learning. Make it portable and transferrable, and wish them well!
| Week | Hero’s Journey Stage(s) | What will happen |
| Freshers | 1 – 4 | Host a welcome event with lecturers and second year students present. |
| Have a post-it note wall for students to anonymously note what they are hoping to get out of the course | ||
| Have a table of laptops for students to add their concerns onto a Padlet | ||
| Provide a tea & coffee table, with topical articles relating the subject on it to help students break the ice and start to talk with each other about. Lecturers to help guide the discussions, highlighting when relevant topics will be discussed in class. | ||
| Display posters that clearly outline the course structure and assessment methods. | ||
| 1 | 5 | Classes/lectures begin |
| All first sessions to be focussed on teamwork, with high levels of active learning to set the tone for the rest of the course. | ||
| Any large scale lectures to incorporate discussions in pairs and require contributions to Menti polls. | ||
| 2 – 6 | 6 | Set one quick formative assessment task per learning session, to include: Start of lesson quiz Team creation task (posters, blogs, presentations etc) Peer marked worksheets |
| Lecturers to provide guidance on study methods to avoid common errors identified during the formative assessments. | ||
| 4 | 7 | Inform students that there will be a mid-module assessment in two weeks. Explain the structure of of the assessment and how it will be marked and graded. Provide an overview of common errors and how to avoid them. Provide a suggested study plan to include specific resources and encourage group studying. |
| 6 | 8 | Host the mid-module formative assessment. |
| 7 | 5 – 6 | Continue to teach with good practice as prior to the assessment. |
| Assessments to be marked (peer marking is OK if validated by the lecturer) | ||
| Students to be updated with how marking is going and any trends of good/poor knowledge and assessment practice. | ||
| 9 | 8 | Students to receive personalised feedback that offers good insight into how they can improve for the summative assessment. |
| 10 – 11 | 10 | Key trends from the feedback to grouped into three categories and learning activities differentiated so that students can practice the required skills in preparation for the summative assessment e.g. Writing skills – students that received feedback on their writing complete tasks in written format with the aid of sentence starters and an essay structure guide (it is OK to find pre-created examples online);Analysis skills – students that received feedback on their analysis to work in pairs to complete activities. They should complete the task by analysing the topic of the activity together.Evaluation skills – Students that received feedback on their evaluations complete the activity by writing a paragraph that sums up the topic, highlighting the overarching themes and suggestions. |
| 12 | 11 | Students complete their summative assessments |
| Post module | 12 | Lecturers to mark and provide timely (within 20 days as per Cardiff University Policy) feedback on the summative assessments. |
| Feedback to offer clear guidance on their knowledge of the topic. | ||
| Feedback should also identify what the student does well and not so well with regards to their studying and wider soft-skills such as team working and communication. | ||
| For more support on marking and feedback, click this sentence to download some guidance. | ||
| Post summative assessment | Review the module. Consider how well students engaged, achieved and how many of the cohort was retained. Where possible, ask students to provide feedback to guide your thoughts. | |
Module timings
When planning a module, it’s worth being specific about how students will spend their learning hours. As a general rule, students should spend 100 hours learning per 10 credits. It is likely that this will be a combination of:
- Taught hours;
- Collaborative study hours
- Guided study hours (often asynchronous and online)
- Independent study and assessment preparation
- Assessment preparation (likely to take about 25% of a student’s learning time)
You can use your module map to communicate these expectations with your students.
When designing tasks across these modes, give the task a go where possible so you can get a sense of how long the activity takes, bearing in mind that understanding the task and working with unfamiliar ideas and navigations will mean most students work significantly more slowly than you! Even if you do not have time to complete the task, it is worth bearing in mind that staff and students alike tend to underestimate how long a task will take us (Kahneman & Tversky, 1979).
You can give indicative times with your tasks to help students to plan their time. You could also ask your students to tell you how long the activity took them so you can fine-tune for future cohorts. It is important for staff and student wellbeing, as well as inclusion, that the activities you offer are time-bound and reasonable. Chatting to other staff, or exploring your programme’s line plan, might help you see where pinch points are for assessment so that a student’s overall workload expectation can be re-organised for best student wellbeing, engagement and outcomes.
This method of reflection aligns with the core concepts of Universal Design for Learning (UDL). Click this sentence to learn more about UDL.
To ensure your module is well-paced and gives students the opportunities that they need to practice ahead of their assessment, it is worth planning your ‘scheme of work’ which explains week by week what skills, knowledge and experiences you plan to cover through tasks and resources as you approach your formative and summative assessments. You could even use your module map to help plan this out.
Active and inclusive lesson plans to support learning
Elsewhere in the toolkit, we have explored how we can be excellent teachers and create engaging learning experiences. These pages should help you to plan your contact time.
Individual lesson plans are also very helpful in clarifying your approach to the time you have synchronously with students, whether face-to-face or online. They also help your curriculum to be more sustainable and for the team to plan together around what students are learning to maximise efficiency and impact at the programme level.
Cardiff Learning and Teaching Academy lesson plan template
The following seven-minute video sees Ada Huggett-Fieldhouse from the Learning and Teaching Academy offering guidance and explaining how she plans her sessions using a lesson plan template, whilst bearing in mind principles of Universal Design for Learning. You can use the learning activities above to consider what skills students are practising and their alignment to your assessment.
See here for our tips on planning large lectures.
Learning materials
Excellent learning materials are accessible, interactive and designed with the learners in mind. Watch the following 7-minute video from Library colleague Joe Nicholls on learning materials.
learning activity design – captions from Joe Nicholls on Vimeo.
Learning material development takes time. Before starting from scratch, ask yourself:
- Do relevant learning materials already exist that could be adapted or collated?
- Is this a case of creating, adapting, locating or simply collating learning materials into a meaningful representation for students (such as in the case of creating a reading list)?
- Might there be something in the Open Education Commons or other subject specific resource data base? Talk to your colleagues if you aren’t sure.
- Might a professional service such as Cardiff Learning and Teaching Academy, Library Services or Academic Skills be able to help?
- Might a colleague, or I have something I can adapt?
- If I am using a new technology, might I benefit from training?
Operationalising assessment
Developing assessment criteria
In previous sections, it was made clear that learning outcomes are what successful students will have accomplished and be able to do at the end of a programme or module. Assessment criteria is where students are challenged to evidence the development of their knowledge and skills from completing a module or programme. The development of assessment criteria is a process that should be discussed with a programme team to ensure that students are able to improve from assessment from assessment.
To help students aim for what success looks like for them, they need to understand what the quality of the work looks like at each level. To help, provide them with examples of past work that has achieved a range of grades and encourage students to analyse the differences between them so they can adapt their own assessment methods. A good time to do this, is after a formative assessment when students are most interested in what they can do to improve.
To determine how assessment-savvy your module is, there are many small-scale interventions that can be undertaken through use of the EAT Framework. The Framework is full of guiding steps for producing new modules and provides an evaluative mapping tool which can help us to consider what steps will have the most impact for our students’ understanding and engagement of assessment.
It is worth thinking about the potential for any assessment ‘nightmares’ in advance of running the assessment. Sambell gives a list of assessment nightmares and approaches to avoiding them.
Planning for Marking
Whilst it might seem counterintuitive to think of how you will mark an assignment before you think about how you might go about teaching it, it is crucial that you do this in order to be able to explain to students how they can achieve.
Phil Race’s article titled ‘Using Feedback to Help Students to Learn‘ provides a group activity for evaluating different ways of marking by effectiveness and efficiency.
It is possible to co-create a marking approach with students: for instance, would a lighter marking approach on summative assessments suffice if plenty of formative feedback was given on a formal formative assignment?
Planning for Formative Assessment(s)
To help prepare students for the summative assessment, each module should include a formative assessment that either looks like the summative assessment or is part of it (patchwork approach). However, for this to be effective, students need to receive their feedback in good time to learn from it before their summative assessment.
Planning for Formative Feedback
Formative feedback can be given throughout a module and is not just a tool for use after an assessment task. Purposefully plan interactions where students are doing and giving or receiving feedback, across formalities and modes. Try not to underestimate the power of verbal feedback during a learning activity. As students are working, walk around and give verbal feedback:
- Stretch and challenge questions e.g. “Why do you think that?” or “Can you give an example of how that would work in the field?”
- Prompting analysis with other students/groups e.g. “go and chat with the group over there, their discussion is taking a different view to yours.”
- Reinforce the importance of evidence e.g. “I’ve not heard that before, what are your sources (non-academic sources allowed as a starting point)?”
- Reminders of typical errors in assessment or knowledge e.g. “Careful not to fall into the trap of ‘x’.It’s a common mistake that you don’t want to make in the assessment.”
Then take the next step and plan in reflective and discursive activities around how this feedback can be used for improvement. Consider how students capture and use this feedback: for instance, will students make changes to plans or keep a reflective log? Encourage students to make explicit what they are learning and where they will use it.
🎯Activity
- Look at the following sources of feedback. Consider how these could be planned as activities in your module.
Student-resource interactions Student-student interactions Student-teacher interactions MCQs Quizzes
Considering academic texts / video
Looking at other sources
Exploring example assignments
Peer review activities Marking each other’s quizzes
Peer instruction activity
Pair or teamwork activity
Verbal feedback in class Written feedback
Audio feedback
Whole group feedback in-class or via DLE
- Consider how each of these elements could interact in order to maximise student ownership of feedback and to minimise staff workload.
Example: In this example, students need to demonstrate that they understand the workflow of a process. A learning activity with formative assessment built in may look like this:
- Before a lesson – Students individually produce a flow-chart for a process they need to understand for their assignment. They compare their flow-chart to an academic flow-chart on a similar topic, draw out what is good and make improvements.
- In-class Students work in small teams (3 – 5 students per team) to compare their work and produce team flow-chart. The teacher looks at these and gives whole class feedback via video in the DLE.
Deeper dive
Lesson Planning
The CLTA Template not for you? Why not explore the following resource that gives alternatives.
QAA Document on Contract Cheating
Contracting to Cheat in Higher Education
The QAA alongside University of Derby have developed an automatic mapping tool within Excel for module and programme teams to visualise their course, as well as being better able to explain their students’ journey. Please contact the Academy if you would like to have a session facilitated on using this tool.
Generating Inner Feedback
Beyond the Technology Podcast
Listen to our series on rethinking assessment and feedback from the Beyond the Technology podcast:
Rethinking assessment and feedback - unlocking the power of comparison based feedback
References
Hinchcliffe, T. 2021 The Hidden curriculum of Higher Education [Online]. Available at: https://www.advance-he.ac.uk/knowledge-hub/hidden-curriculum-higher-education [Accessed 30/8/22]
KAHNEMAN, D., & TVERSKY, A. (1979). Intuitive prediction: Biases and corrective procedures. TIMS Studies in Management Science, 12, 313–327.
Rienties, Bart and Toetenel, Lisette (2016). The impact of learning design on student behaviour, satisfaction and performance: a cross-institutional comparison across 151 modules. Computers in Human Behavior, 60 pp. 333–341.